Risk-Based Testing is an approach for QA and testing teams who want a focused testing strategy based on risk assessment and analysis. If you’re looking to optimize and improve your testing time and resources, you’ll be glad to know that Xray offers built-in capabilities that support Risk-Based Testing.
Keep in mind that Xray on its own doesn’t provide risk management capabilities so it will be up to you to define risks and how you will manage them. If you’re new to Risk-Based Testing, read up on our Complete Guide to Risk-Based Testing to familiarize yourself with the concepts, purpose and processes.
In this post, you’ll learn how to perform Risk Analysis by defining impact, probability and risk-level, as well as how to set-up and configure your Risk-Based Testing strategy using Xray.
The order in which the topics are introduced are:
- Performing Risk-Based Testing;
- Defining Where to Set the Risk;
- Defining Impact, Probability and Risk Level;
- Sorting and Re-ranking Tests in a Test Execution by Risk Level;
- Analyzing Overall Requirement Coverage by Risk Level;
- Finding out Defects Related to Certain Risk Levels;
- Tracking and/or Disallowing Changes on “Requirements” and in Test Cases;
- Using Different Test Plans Based on Risk Level.
Performing Risk-Based Testing with Xray
The first step of this process is to decide where to set the risk (i.e. on requirements, Tests or at project level.) This will affect how you will implement the related fields and how you will use Xray during RBT.
For risk management, you need to choose if you're going to use a specific app (e.g. Risk Management for Jira, Risk Register.) You can also use Jira or a generic customization app (e.g. Jira Misc Custom Fields) which can be enough for risk identification and analysis.
After you have decided where to set the risk and how, you’ll be ready to perform Risk-Based Testing with Xray.
Prioritizing test cases with risk in mind is just one of the many activities related to Risk-Based Testing which you can take advantage of with Xray.
Defining Where to Set the Risk
As long as you are able to define a sortable value for the risk as a custom field in either cover-able issues (e.g. "requirements"/stories) or Tests themselves, then you will be able to select and rank Tests for execution, based on risk level. If you have identified global risks at the project level as issues, and those risks can be mitigated somehow by testing, then you can also use RBT with them.
Thus, you may define risks (and the corresponding risk level as a sort-able custom field on the related issue) at:
- Test level;
- Requirement/story level, or any other issue type that can be covered with test cases (i.e. configured as "requirement issue types" on "Issue Type Mapping" settings);
- Project level, using a specific issue type.
Each approach has its own usage scenarios and pros/cons. Throughout this article, most of the examples will be based on risks defined at Test level.
Adding Tests to a Test Execution/Test Plan/Test Set - Sorted by Risk Level
Whenever adding Tests to an existing Test Execution/Test Plan/Test Set, you may choose to show the impact, probability and risk level related fields.
Tests can be ranked by descending order of risk level, so the ones related with higher risks can be addressed first; you may also sort Tests by impact or probability if you want.
To sort a column (i.e custom field) by descending/ascending order, just click on the column name.
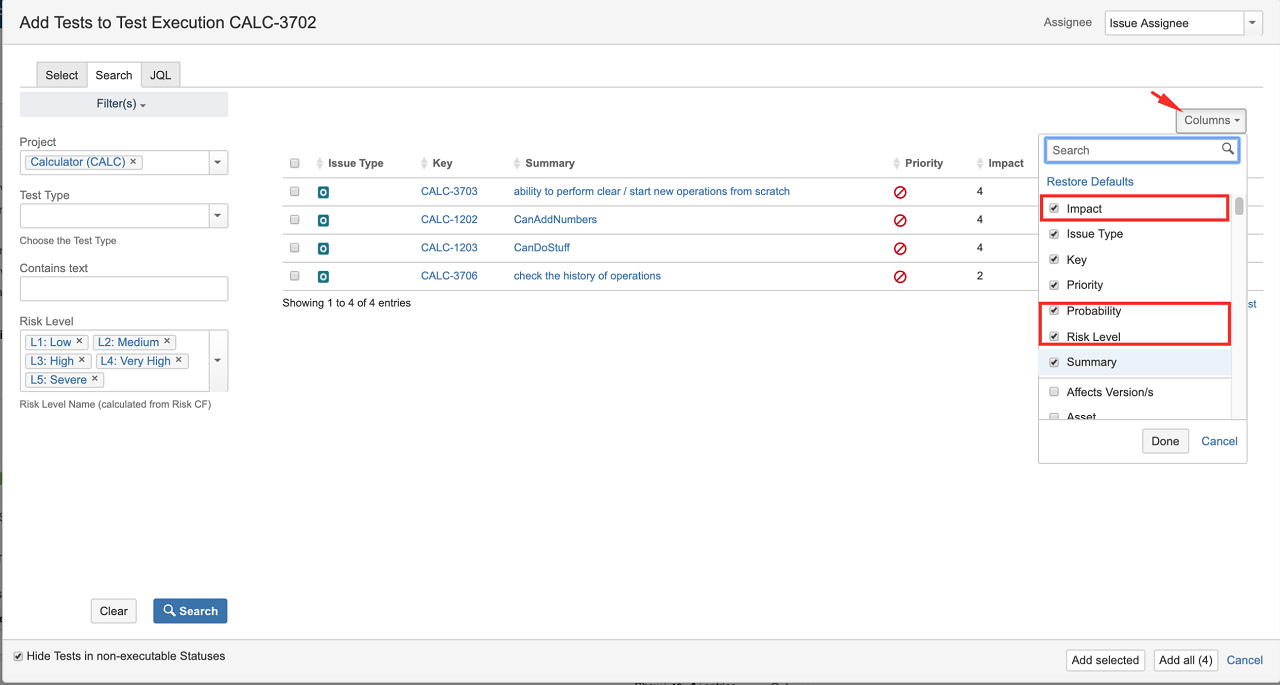
On the left side, you may use filters on the impact, probability and risk level fields. Filtering by risk level is essential but filtering by other related files may prove to be useful.
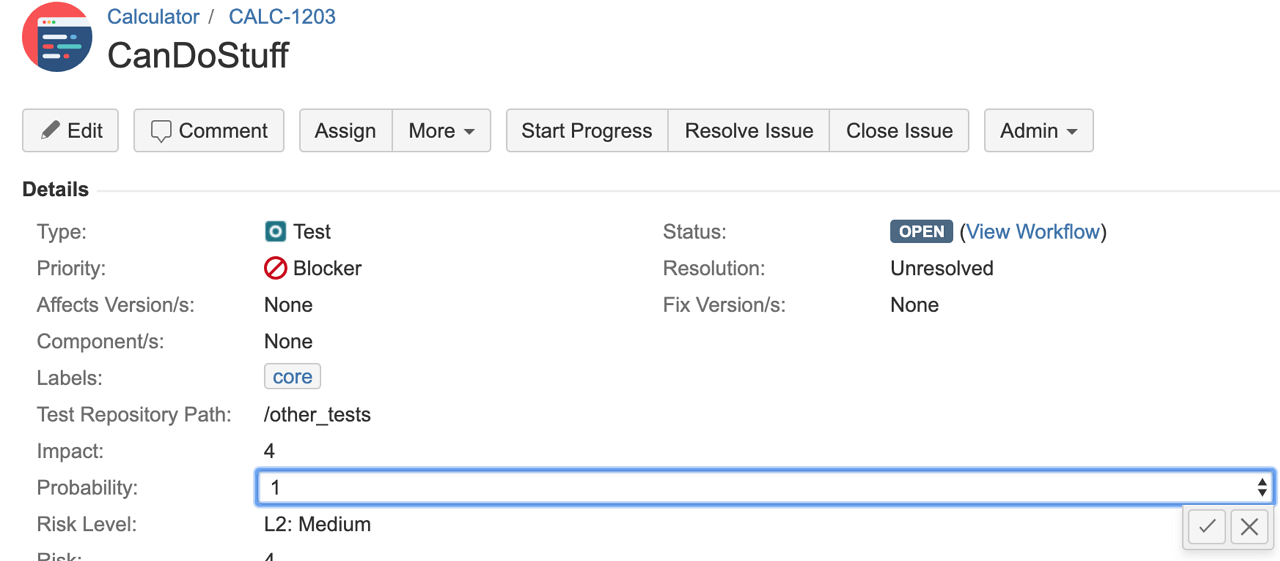
Defining Impact, Probability and Risk Level
The first part of building your RBT strategy is performing Risk Analysis. During Risk Analysis you will need to define impact and probability as a means to calculate the risk level.
Keep in mind that impact and probability are mostly temporary values used to calculate the risk; they can be assessed early and updated if needed during Risk Monitoring and Reviewing.
Where and how you define impact and probability fields depends on your approach, including how your fields will be implemented.
The following screen shows how to add Tests to a Test Execution/Test Plan/ Test Set, sorted by risk-level.
Sorting and Re-ranking Tests in a Test Execution by Risk Level
Risk defined at Test level
A Test Execution contains a list of tests to be run accordingly with their ranking (i.e. which you may see in the first column, named "Rank").
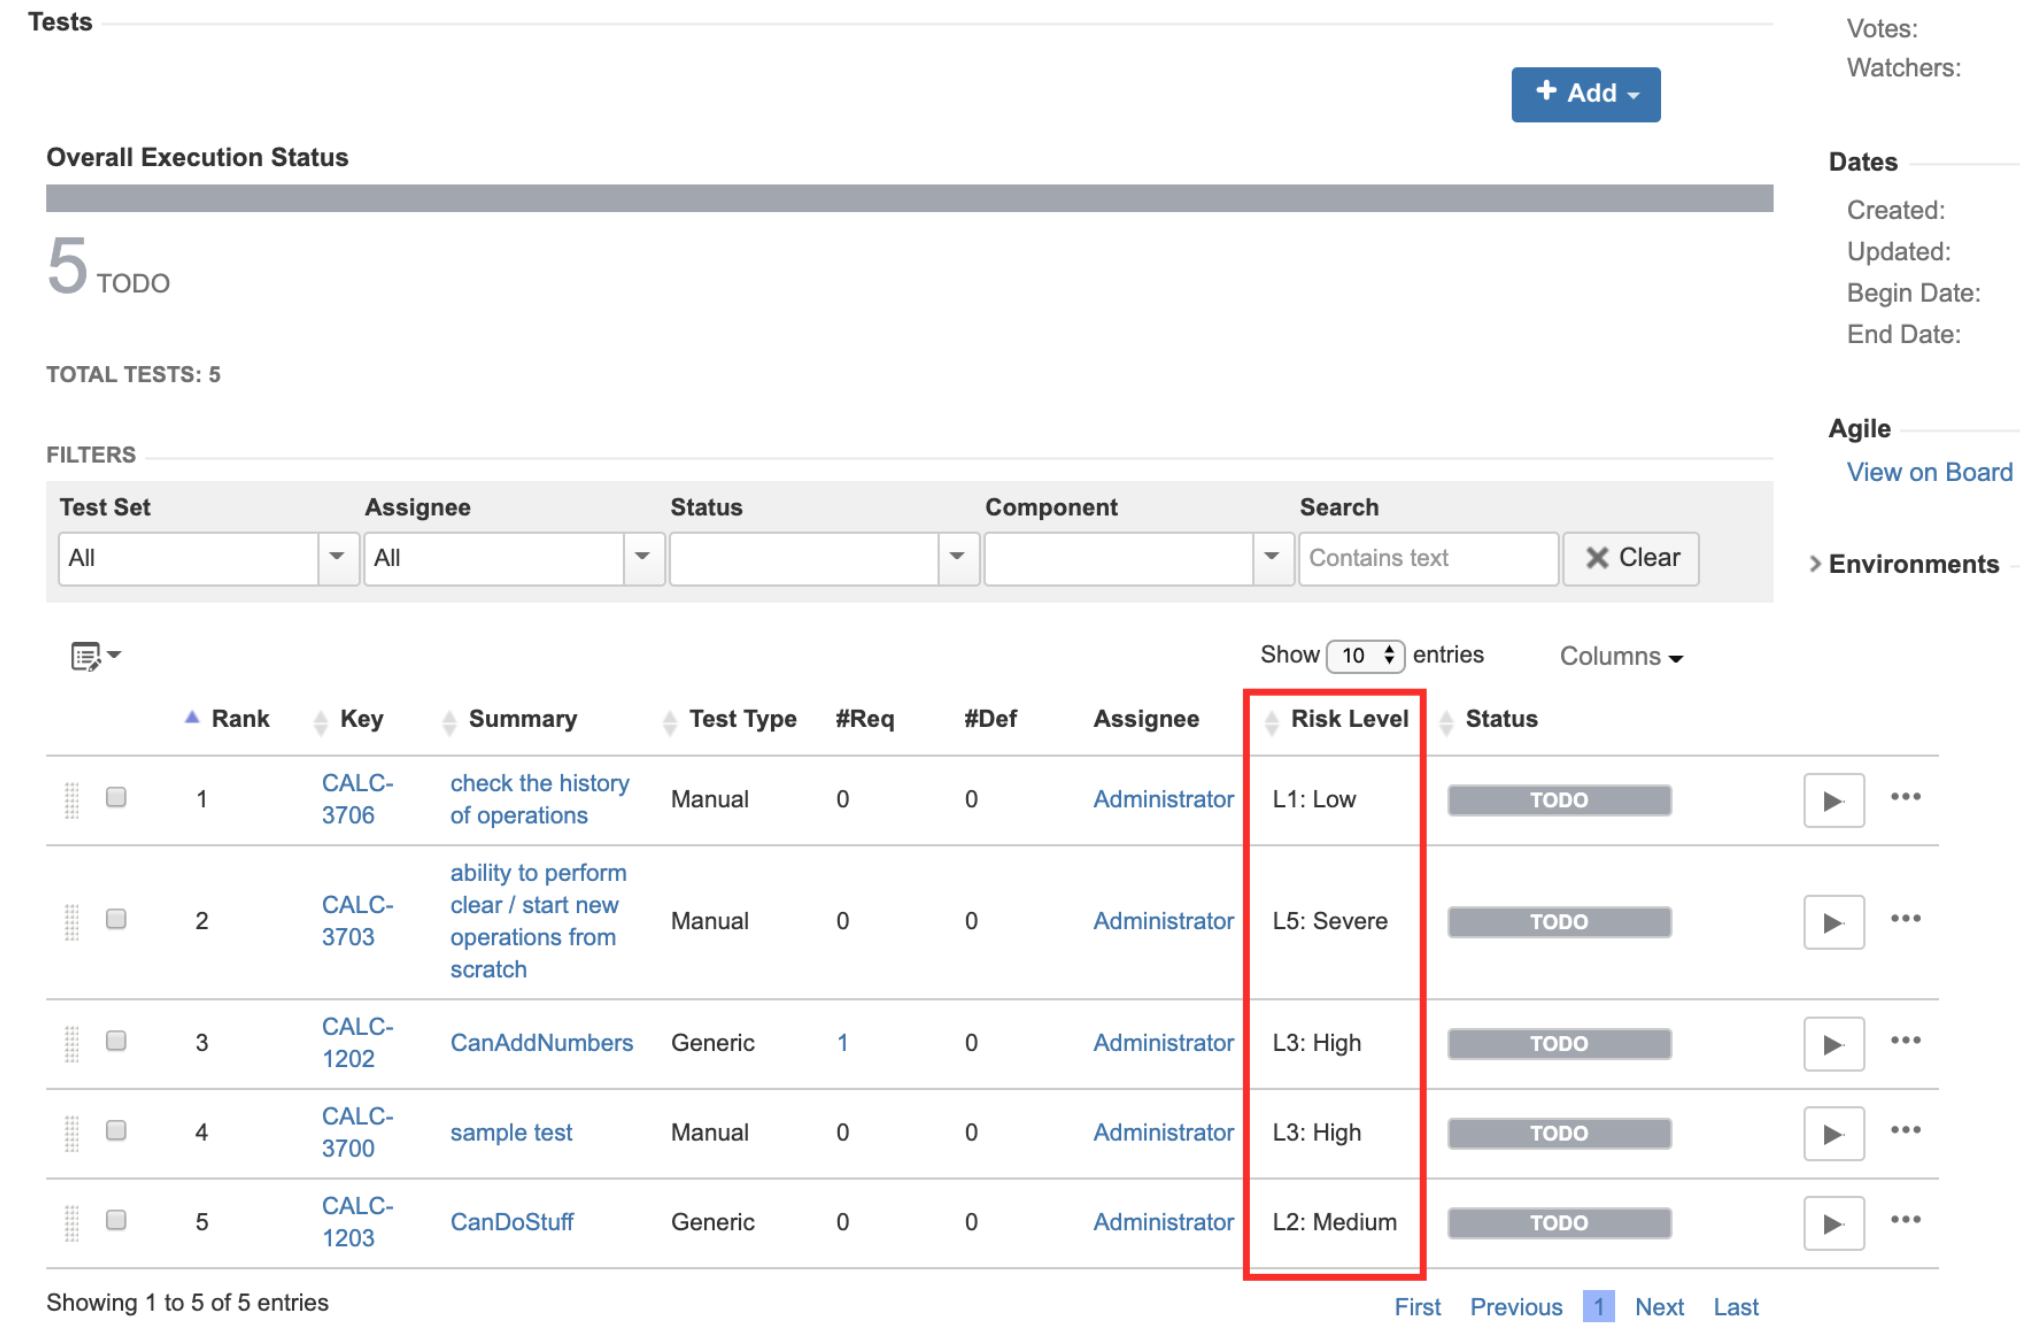
Tests may be visually ordered ascending/descending by clicking on the column name; this won't affect their ranking, which is the one used as the effective order to run the tests. If you want to make this order permanent, by setting the rank accordingly, then you can choose "Apply Rank."
Analyzing Overall Requirement Coverage by Risk Level
Risk defined at requirement or at the project level
If you have assessed risks at the requirement or project level, then Xray offers you the possibility of analyzing coverage by risk level (and even by impact and probability). This is supported as long as those fields are "Select List (single choice)" based; number or text-based custom fields are not supported for grouping purposes.
What you can use this for?
- analyze the coverage status by risk level (e.g. How are my "Severe" level requirements/stories in this version? And in this environment? Are they all OK? Are some NOK due to failed tests?)
- find important uncovered requirements (e.g. Are all my requirements/stories with a high risk covered with test cases?)
- know where you should spend your focus, i.e. prioritize your effort (e.g. "if all the more risky requirements have been addressed first")
Overall requirement coverage report
The Overall Requirement Coverage Report allows visually grouping of requirements by custom fields, thus you may easily group by risk level related field, for example.

The report also allows you to drill-down on the bar and see exactly which requirements have that risk level, for example, and that are on that specific coverage status (e.g. "OK"). This can be quite handy to evaluate the completeness and the failed tests, especially if the requirement is NOK.
Overall requirement coverage gadget
If using the Overall Requirement Coverage gadget, then you need to pick a project (and not a saved filter) as the data source; only then Group By will allow you to select specific custom fields to group your requirements, such as the Risk Level related custom field.
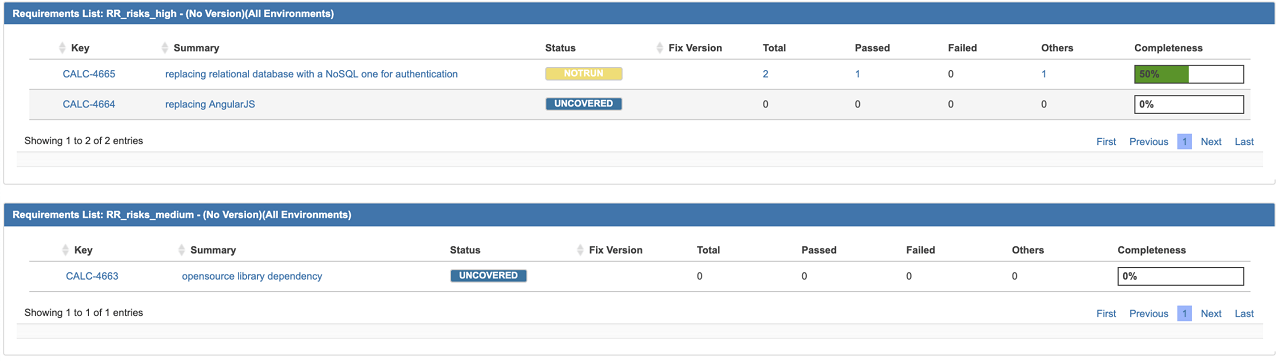
Requirements list gadget
The Requirements List gadget may be used to show just the coverage status, completeness and information about the passed/failed tests of requirements having a certain risk level. Thus, it is a great way to track the actual consolidated progress of your requirements/stories.
As this gadget does not provide a grouping mechanism, you need to instantiate it multiple times configuring each instance with a different filter for picking only the requirements having a certain risk level.
Finding out Defects Related with Certain Risk Levels
As your testing progresses, you may find certain defects along the way that you have to manage. You should classify your defects or handle them as risks.
Anyway, you'll need to find defects related with certain assessed risks, no matter at what level they were identified, so you can decide how to proceed or treat them.
Xray provides several JQL functions that can be used to obtain these defects. Remember to complement your JQL query so you can find only the defects you want (e.g. the ones assigned to a certain AffectsVersion, for example).
Examples of JQL queries:
- Risks defined at requirement or project level
- issue in defectsCreatedForRequirement("risks_severe") and ...
- Risks defined at Test level
- issue in defectsCreatedDuringTesting("tests_risk_severe") and ...
Tracking and/or Disallowing Changes on "Requirements" and in Test Cases
In order to avoid unnecessary risks or at least mitigate them, you may enforce “reviewing on requirements” and even on test cases. Since requirements are issue type based, you may apply Jira workflows on them and/or set them to read-only. This can be extended to Test Plans and any other issue types used by Xray.
Usage examples:
- Upon a change on a "requirement"/story, enforce related Tests to be reviewed (i.e. transition the related Tests to a specific workflow status);
- Set "requirement"/story related issue to read-only on a specific workflow transition, to ensure no changes are made without being reviewed; in order to make changes, require a specific workflow transition to be made; to implement this you just need to configure the related Jira workflow;
- Enforce workflows on Test and Pre-Condition issues, to make sure the specification is reviewed.
Note: all changes are tracked, directly on the respective issues; in the case of Test Runs, changes also get tracked on the related Activity section.
Using Different Test Plans Based on Risk Level
Xray gives you the ability to create one or more Test Plans if you wish to manage and track the testing progress for different tests independently.
Therefore you may create, for example, one Test Plan containing all the Tests related with the highest risk level items and distinct ones for the other risk levels; on each Test Plan, you may further prioritize Tests.
If you have multiple Test Plans, and because they are issues, you may prioritize them in the current Sprint or Kanban boards. You can also "label" these Test Plans somehow to distinguish their relative relevance; you may use Jira's native Priority field for this as it comes by default and fulfils this purpose.
How to setup and configure RBT with Xray
In order to start with RBT, you have to configure the risk management related fields. You may use Jira built-in capabilities or use a risk management or even a customization app instead.
Risk-Based Testing is a Framework for Communication
As you’ve learned, the purpose of RBT is to use risk management principles for adequate testing. It will provide you with a framework for clear communication and discussion of risks between the testing team, developers and stakeholders. The benefits of RBT are many; primarily you'll focus more on what customers are concerned with, increase the risk level of "positive risk", and finally make a simple no/go decision on releases based on risk.
Performing Risk-Based Testing with Xray is great because it is Jira native, which fosters even more visibility and transparency between testers and developers. Are you ready to take advantage of these features? Start your free trial with Xray today.